


 Blogs
Blogs


1. BAD OVERHANGSIt's not trivial to get a perfect result with “perfect” overhangs. It depends on the material, the printer you are using and on your printing settings, which angles of overhangs are possible to print. Typically, around 45-degree angle are possible to print. In FDM / FFF 3D printing, each layer must be built upon another. Obviously, you cannot print into the air and that´s why you must consider about some points before you start your print. Perfect placement, adding support structure or breaking the part into more pieces are common tricks to optimize your 3D print. You may use an overhang test model, like the one from the make magazine, download link: http://www.thingiverse.com/thing:533472/#files ADD A SUPPORT STRUCTUREAn easy way to get better results are support structures. We can´t recommend which settings are the best, because they change when you change layer height or material. We recommend starting with the standard settings in your slicer program, if you have to change them, try again and repeat the try and error method. Keep in mind, that support material takes additional printing time and sometimes optimization of your models’ placement is another solution. REDUCE LAYER HEIGHTTo prevent your print of failed overhangs or to reduce support structure, it is also possible to reduce the layer height in your slicer software. PART COOLING FANTo realize higher angles of overhangs, your material has to cool down quite fast after printing it. If your printer has a part cooling fan you should activate it or increase the fan speed. Also check if the fan and ventilation slot are in right position (control, that the air cools your part and doesn´t go anywhere). ADJUST THE PRINT SPEEDAs often it is a combination between printing speed and extruder temperature settings to get the best results for overhangs. We cannot give you the all-round solution, because it differs from material to material, from printer and part cooling fan. We recommend doing overhang printing tests to optimize your settings and to find out which angles of overhangs are possible. You may use an overhang test model, like the one from the make magazine, download ADJUST NOZZLE TEMPERATUREAs often it is a combination between printing speed and nozzle temperature settings to get the best results for overhangs. We cannot give you a general solution, because different materials, printers and part cooling fans influences the outcome of the overhang very much. |
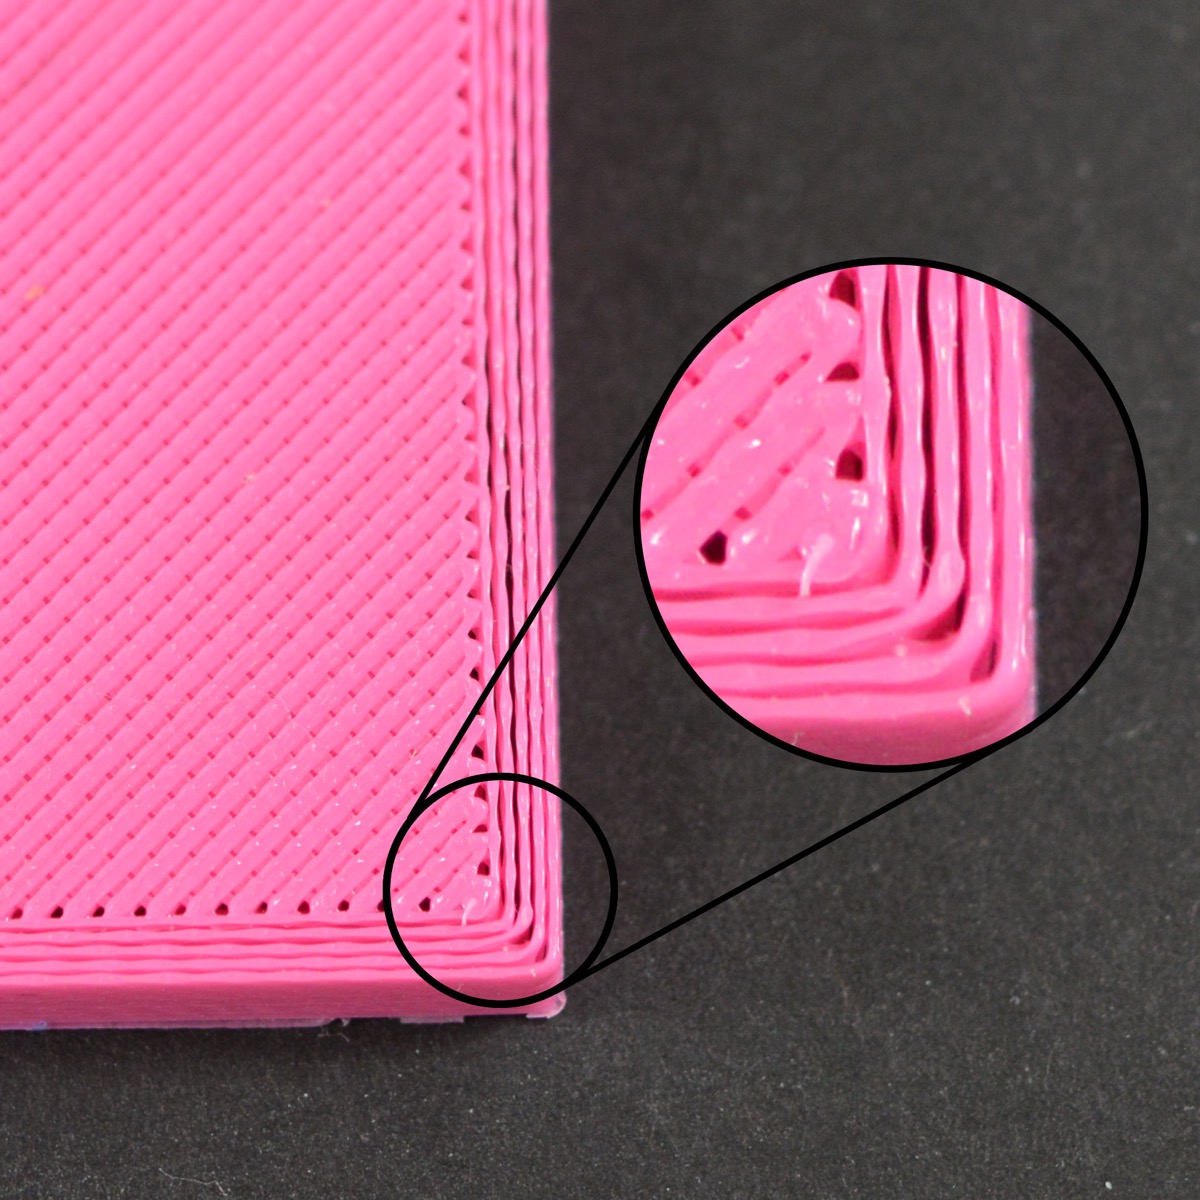
2. BLOBS, ZITS AND PIMPLESYour 3D printer must execute a lot of changes in extruding in movement directions during the printing process. If the settings of retraction are not optimized, it could lead to defects on the surface of your print. Sometimes these deformations are also called zits or pimples. ADJUST RETRACTIONRetraction is the pulling backwards of your filament during the printing process. When the hotend of your 3D printer is moving to a new location (extruder moves without extruding) strings may occur, because the melted filament is oozing out of the nozzle. This can be improved by pulling back the filament in the moment your hotend stops extruding. First, make sure that you have enabled retraction. Second step will be to optimize retraction settings, like retraction – distance and speed. RETRACTION DISTANCEThe distance defines how much the filament is pulled back of the nozzle. It depends on your printer what the best distance will be. Try it out by printing two cubes which are 40mm away from each other and increase retraction distance by 0,5mm and monitor the best performance. For most printers, the retraction distance should be between 1 and 5mm. RETRACTION SPEEDThe retraction speed is also an important setting that influences your print. If you retract the filament too fast, the filament may separate from the melted part. Otherwise, if you retract too slow, the nozzle may leak before starts printing at the new position. For most printers, the retraction speed should be between 20-100 mm/s or 1200-6000 mm/min. Try it out by printing two cubes which are 40mm away from each other and increase retraction speed by 20mm/s or 1200mm/min steps and monitor the best performance. CLEAN NOZZLESometimes blobs occur if your nozzle has filament residues on it. New printed filament can catch the residues and may cause defects in your print. SELECT START POINTCommon defects are little blobs at the start / layer tab point of your print. To eliminate these completely can be very difficult. An easy solution/work around is to select new start point, which attract not so much attention. Your slicer software only wants to optimize the process, they are not intelligent and cannot realize the back or front of your print, therefore you must choose the start point. Back to top |
3. CLOGGED NOZZLEOver the lifetime, a nozzle has to extrude several kilograms of plastic. Over time it's very likely that your nozzle clogges. These jams or clogs are usually due to something inside the nozzle that is blocking the plastic from freely extruding. While this may be daunting the first time it happens, but we will walk through several easy troubleshooting steps that can be used to fix a jammed nozzle. COLD PULLA cold pull works best with slippery, soft materials – like Nylon filament. NEEDLE METHODFor this method, you need an acupuncture or hypodermic needle, so that you can try to remove the blockage. Obviously, you’ll need a needle or wire that is small enough to fit into your nozzle bore, typically 0.4 mm. |
4. CURLING OR ROUGH CORNERSSmall areas in your print have similarities to overhanging issues. The plastic warps and strings are hanging out of the object. This issue can also be called “Warping at Overhangs”. It appears if the part is not cooled plenty and the extrusion temperature is too high. ADJUST THE NOZZLE TEMPERATURESet the nozzle temperature 5-10°C lower and give the plastic the time to cool down. In this solid state the hotend will not deform this layer by arriving for the next one. For further advises, please read the solutions for “Extrusion temperature too high”. PART COOLING FANTo avoid curling, a good opportunity is to raise the fan speed percentage. The plastic hardens more quickly, so that the next layer does not get deformed before it has been cooled. Back to top |
5. DEFORMATIONDeformations often occur at the tip or thin ends. The main reason for this problem is a too high temperature for the chosen filament. Parts of the object look like over extruded. The whole print looks melted. If the temperature is too high, the plastic can cake on the inner wall of the nozzle and block it. A good balance between enough temperature, speed and cooling is needed to get the plastic in the right shape. ADJUST THE NOZZLE TEMPERATUREOur print looks like melted chocolate. The layers are not clear defined and partly felt over the other layer. In other cases, the plastic also can warp. Try to set the nozzle temperature down. PART COOLING FANThe temperature for your chosen filament is too high but you need the temperature for this kind of object, then try to switch on your cooling fan and see if the problem is fixed. ADJUST THE PRINT SPEEDIf you are printing with a very low speed, the plastic remains for a longer time in the nozzle and degrades. The melt flow rises and too much plastic comes out of the printer nozzle. Try to set the speed up or the temperature down. Back to top |
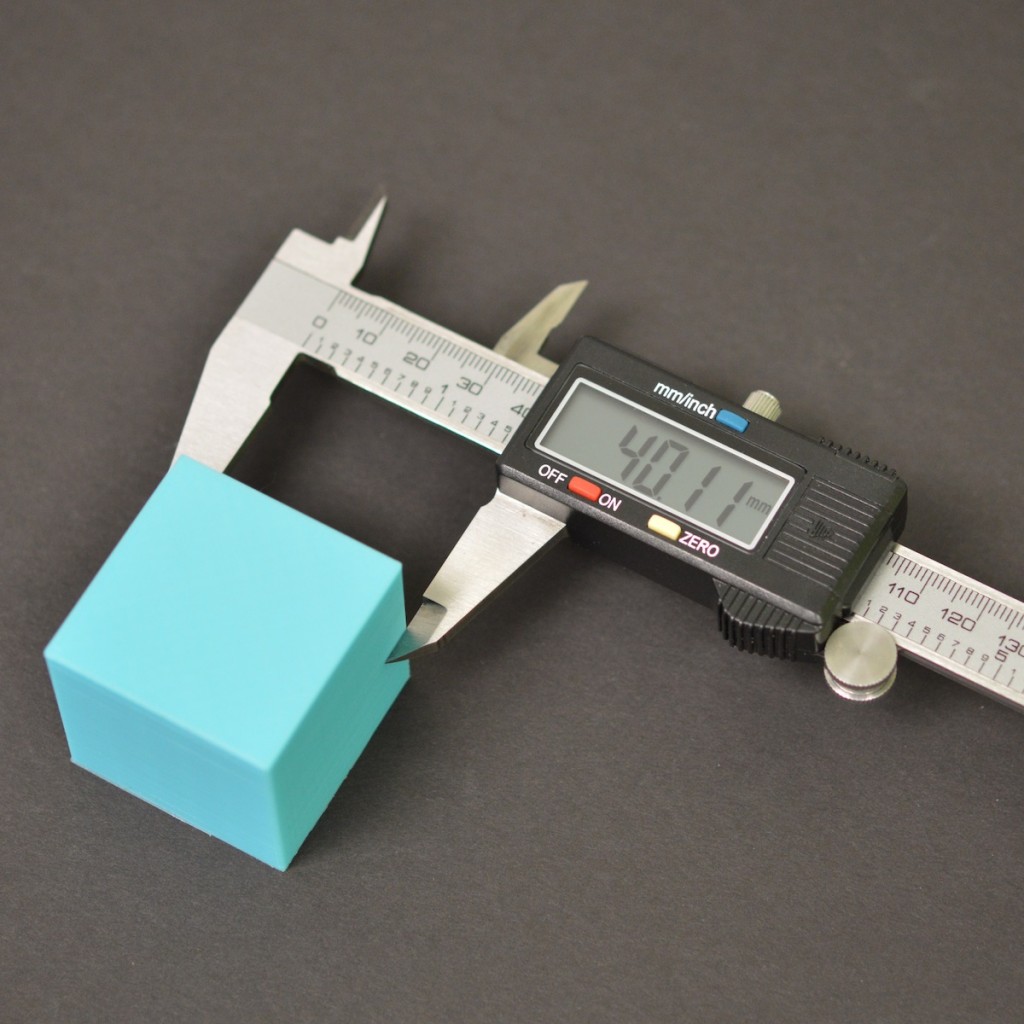
6. DIMENSIONAL ACCURACYThe dimensional accuracy is important if you want to build parts, which have to fit together precisely. Shrinking of the polymer plays also an important role at this part. To handle this issue, you can set the extrusion multiplier or the extrusion width for a perfect result. Also, the first layer height or a constant dimensional error of the printer could be a problem. ADJUST FIRST LAYER HEIGHTFor dimensional accuracy it is necessary to set the first layer correctly. Figure it out by changing in small steps. If it is set lower than the first layer should be, too much plastic will come out of the nozzle and this error will continue to the next 10-20 layers. The result will be oversized layers. EXTRUSION MULTIPLIERFor dimensional accuracy the amount of extruded material is a limiting factor for success. Start at an extrusion multiplier from 1, and if too much plastic will be extruded, decease it in 5% steps. It depends on which material you use, which printer and on the nozzle diameter, how easy the material flows. CHANGE EXTRUSION WIDTHA correct extrusion width is necessary for dimensional accuracy. If the extrusion is set too wide or too small, the whole part becomes lager or thinner than wanted. To avoid this issue, try to set the extrusion width just as the nozzle diameter. SCALE PARTTo minimize the shrinking effect of a polymer, scale the part a little bigger. Previously, a part should be printed and measured. HORIZONTAL SIZE COMPENSATIONThis option can be used, if the offset of the X and Y axis are not sized precisely. The accuracy can be tested with printed parts, which must be measured in X and Y dimensions. After adapting the slicer settings. Back to top |
7. ELEPHANTFOOTThe typical outgoing bow on the bottom of the print, next to the surface, is called „elephant foot”. ADJUST THE FIRST LAYERYou can use your slicer´s settings to increase the height or extrusion rate for the first layer only. Be careful, because the layer height influences also the adhesion on the printbed. Try out in 5% interval. DESIGN A CHAMFERYou can use your construction program to add a chamfer to the edges at the bottom of your part. Be aware, not always the real bottom of your part is placed to the printbed. Adapt the side of your part, you place to the printbed. LEVEL PRINTBEDTo level your printbed and to set the height of your nozzle properly, please follow the instruction of your 3D printer. To set up the proper nozzle height or more accurately, set the correct zero position for the Z-axis helps reduce warping, getting rid of an elephant foot, but also helps to extrude the right amount at the first layer. Most 3D printers do not have a way of sensing when the nozzle touches your print surface, they just rely on an endstop or a separate sensor to probe the bed. For both cases, you usually need to manually set the zero position. The exact procedure differs from printer to printer, but the general idea is usually the same: Use a thin piece of paper for stiffer beds (about 90g per m2 or 0.1mm thickness) and a thicker paper for springy beds (about 300g per m2 or 0.25mm thickness, e.g. a business card). Adjust the endstop or sensor offset until you can feel a slight resistance from sliding the card around when the printer is at the zero position for the Z-axis. Most printers have a semi-automatic mode, by which the print head travels to several defined spots on the print surface and you have to set up the nozzle height manually. If not, start in the centre of the bed for a first rough adjustment, make your way around the bed and repeat for each adjustment point. Move the print head as close as possible to the adjusters and tweak them until you get an even resistance with the calibration cards at each of them. Back to top |
8. FILAMENT GRINDINGFilament grinding arises when the filament cannot move forwards, the extruder is still spinning, and his sharp teeth grind away enough plastic from the filament, so that there is nothing left for the gear teeth to grab on to. You will identify the typical small bits in the filament as you see in the picture. Sometimes you hear clicking noises of the extruder. SLIPPING EXTRUDER GEARAll FDM 3D printers use a small drive gear which grabs the filament and presses it against a bearing or another drive gear. This drive gear has sharp teeth, that allow it to grip the filament. If the filament is unable to move, the drive gear keeps spinning and it can grind away enough plastic from the filament so that there is nothing left for the gear teeth to grab on to. If this happens on your printer, you will usually see lots of small plastic chippings from the filament that have been shredded away. You may also notice that the extruder motor is spinning, but the filament is not being pushed in the hot end. To solve this problem, you can try:
If the extruder slipped, make sure that the drive gear of the extruder is clean, because the plastic shreds can fill in the teeth of the drive gear. If this happens it is more likely that the drive gear slips again. ADJUST NOZZLE TEMPERATUREIf you recognize that the extruder sometimes has a hard time to push the filament through the hotend, it´s maybe because your nozzle is too cold, try to rise the temperature by 5-10 degrees so that the plastic flows easier. ADJUST PRINTSPEEDIf you are printing too fast, it can cause filament grinding. By reducing the printing speed, the extruder motor will not need to spin that fast, since the filament is heated up over a longer period. The slower rotation of the extruder motor can help avoid grinding issues. The same thing happens with the different axis, if the printing speed is too high, the motors must accelerate and decelerate much quicker, this can cause vibrations and bad looking details. If you were printing at 3600 mm/min or 60 mm/s (the most common printing speed), try decreasing that value by 50% to 1800 mm/min or 30mm/s to see if the filament grinding goes away or print quality increases. If not, it´s very likely that the problem is a different one. If the it works out, try to increase the printing speed in small steps till you find the best balance of a good quality and printing speed. ADJUST RETRACTIONToo powerful retraction settings can cause filament grinding. Try out to reduce retraction speed by 50% and monitor if that influences filament grinding. If yes, we have some recommendations: Retraction speed The retraction speed is an important setting that influences your print. If you retract the filament too fast, this may cause filament grinding or the filament may separate from the melted part. Otherwise, if you retract too slow, the nozzle may leak before starts printing at the new position. For most printers, the retraction speed should be between 20-100 mm/s or 1200-6000 mm/min. Try it out by printing two cubes which are 40mm away from each other and increase retraction speed by 20mm/s or 1200mm/min steps and monitor the best performance. Retraction distance The distance defines how much the filament is pulled back of the nozzle. It depends on your printer what the best distance will be. Try it out by printing two cubes which are 40mm away from each other and increase retraction distance by 0,5mm and monitor the best performance. For most printers, the retraction distance should be between 1 and 5mm. Retraction is the pulling backwards of your filament during the printing process. When the hotend of your 3D printer is moving to a new location (extruder moves without extruding) strings may occur, because the melted filament is oozing out of the nozzle. This can be improved by pulling back the filament in the moment your hotend stops extruding. Retraction settings are important to get good results, so we recommend optimizing retraction settings! CHECK IF THE NOZZLE IS CLOGGEDThere are two common methods to fix this problem: COLD PULLA cold pull works best with slippery, soft materials – like Nylon filament. Again, heat up your hotend to the working temperature of your Nylon or Polyamide filament, push it through the hotend as far as possible, ideally, until your previous material is cleaned out, which obviously is going to be somewhat hard if your nozzle is completely clogged. Then have the hotend cool down. NEEDLE OR WIRE METHODFor this method, you need an acupuncture or hypodermic needle, so that you can try to remove the blockage. Obviously, you’ll need a needle or wire that is small enough to fit into your nozzle bore, typically 0.4 mm. |
9. FIRST LAYER ADHESIONThe print is not sticking on the bed, is one of the most common and discussed problems in 3D printing. The first layer is very important for the whole print. On this layer all the other layers will be placed. A good adhesion to printbed is necessary, because the print would lift from the printbed and the print must be aborted. There are many different things you can do against to cope with this first layer adhesion problem. USE AN ADHESIVE OR HEATED BUILDPLATEThere are many types on the market like PrimaFix, glue stick, other wipe-on or spray-on adhesives or print surfaces like PEI, Buildtak or even unheated Bluetape. It´s important to set the correct temperature of your heated bed for each material and adhesive. For PrimaFix we recommend the following settings:
ADJUST THE FIRST LAYERIf the distance from the nozzle to the printbed is not set properly, you can adjust the first layer height to counterbalance it. As usual a good first layer height is 70-90%. Consider that a nozzle which is too close to the bed, will not extrude material and other problems will arise like “Elephant foot”. When the nozzle is too far away, warping will be the result. LEVEL THE BUILD PLATETo level your printbed and to set the height of your nozzle properly, please follow the instruction of your 3D printer. To set up the proper nozzle height or more accurately, set the correct zero position for the Z-axis helps reduce warping, getting rid of an elephant foot, but also helps to extrude the right amount at the first layer. Most 3D printers do not have a way of sensing when the nozzle touches your print surface, they just rely on an endstop or a separate sensor to probe the bed. For both cases, you usually need to manually set the zero position. The exact procedure differs from printer to printer, but the general idea is usually the same: Use a thin piece of paper for stiffer beds (about 90g per m2 or 0.1mm thickness) and a thicker paper for springy beds (about 300g per m2 or 0.25mm thickness, e.g. a business card). Adjust the endstop or sensor offset until you can feel a slight resistance from sliding the card around when the printer is at the zero position for the Z-axis. Most printers have a semi-automatic mode, by which the print head travels to several defined spots on the print surface and you must set up the nozzle height manually. If not, start in the centre of the bed for a first rough adjustment, make your way around the bed and repeat for each adjustment point. Move the print head as close as possible to the adjusters and tweak them until you get an even resistance with the calibration cards at each of them. USE A BRIMA brim is a printed structure which is attached to your print and increases the surface area of the part to stabilize it or to increase the adhesion. Brims usually have 10-15 outlines and may be 1-2 layers tall. Back to top |
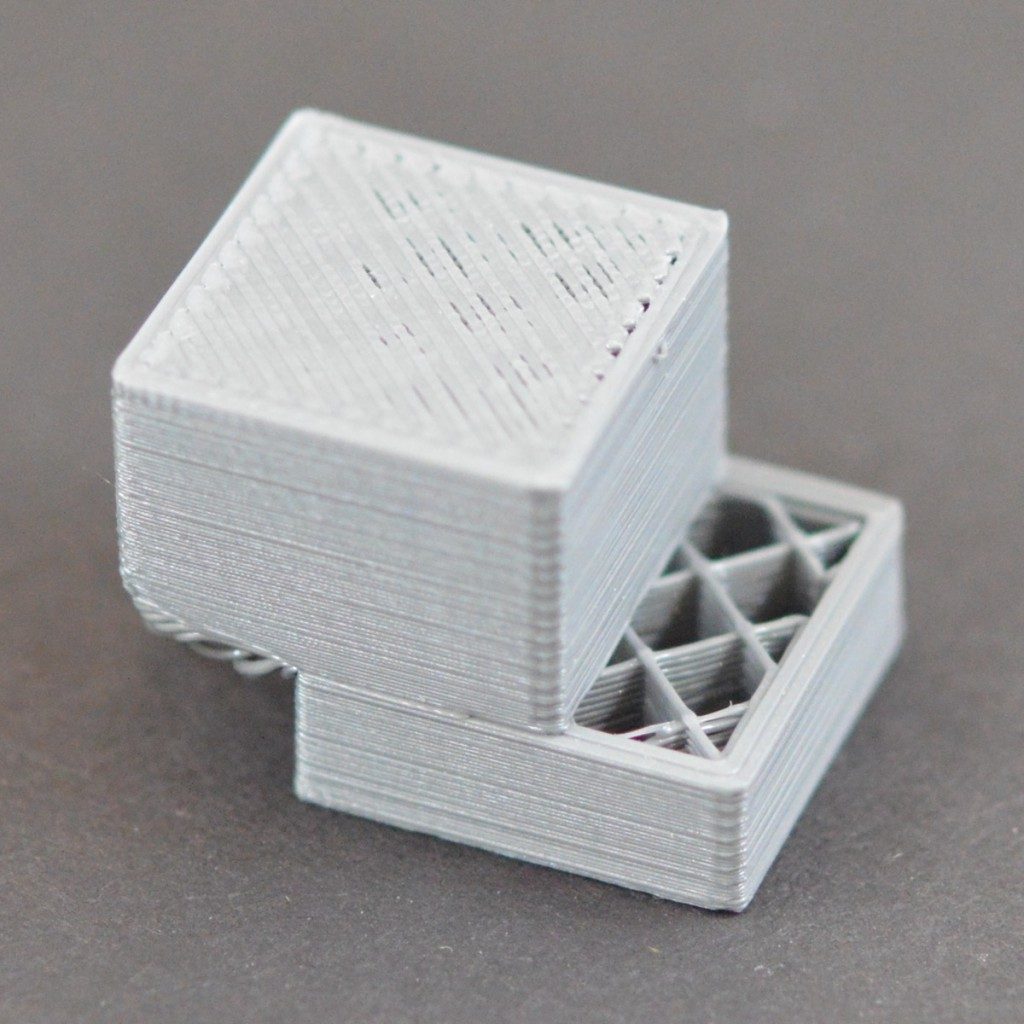
10. GAPS BETWEEN INFILL AND OUTLINEEach of your prints built-up out of several layers which again consist perimeters (the Outlines of the Print) and infill. If you notice small gaps between the perimeters (Outline of the print) and the infill, then there are two topics which you may want to check. ADJUST THE PRINTSPEEDIf you are printing too fast, it can cause layer shifting or a poor print quality. With high printing speed, it could happen that your belts slips over the cogwheel/drive pulleys and your tool head/hotend will lose the right position. INFILL/OUTLINE OVERLAPTo prevent your print of failed overhangs or to reduce support structure, it is also possible to reduce the layer height in your slicer software. |
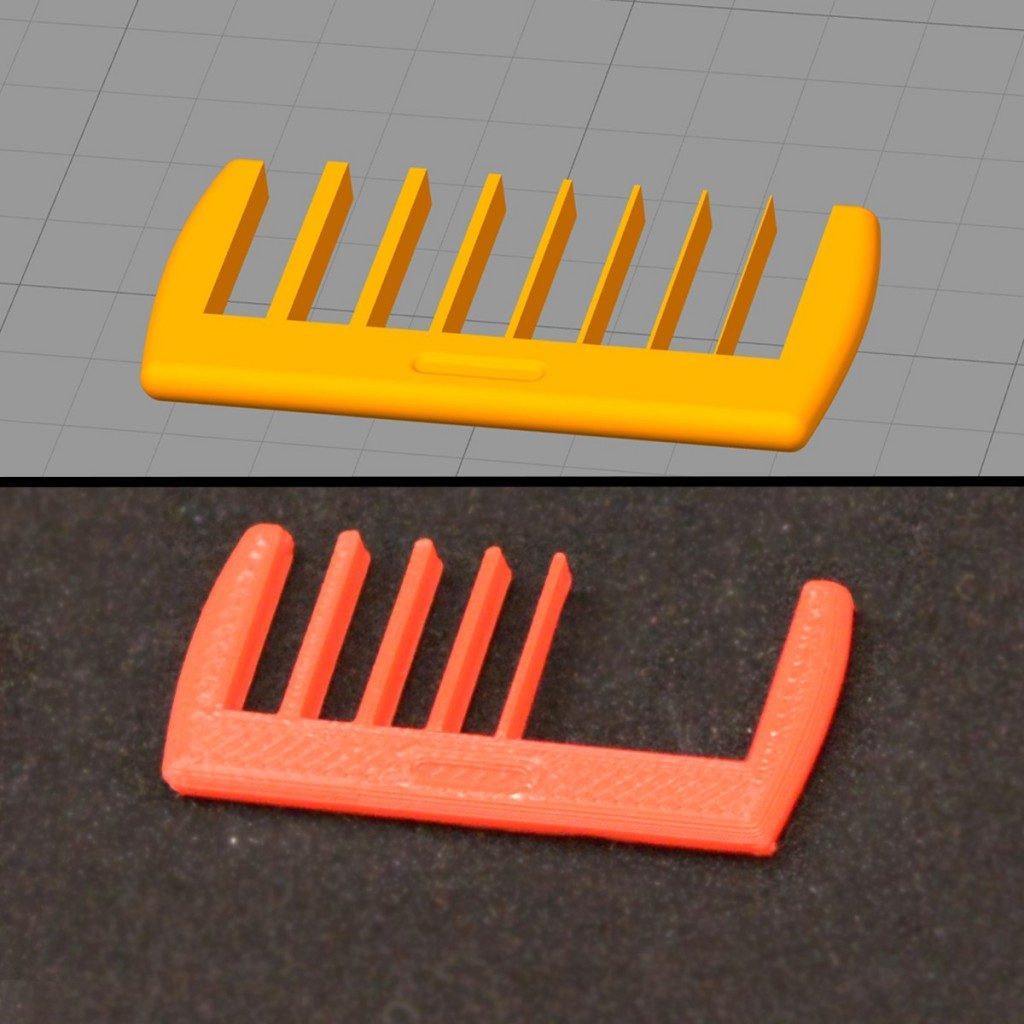
11. GAPS IN THIN WALLSPrinting an object with a nozzle, which is only a few times smaller than the thickest wall, it might be that the slicer leaves a gap in the middle. For example: the wall is 1.5mm, and you are going to print with an extrusion width of 0.6mm, you need to advance some slicer settings for a solid print without gaps. For this reason, adjust the thin wall behaviour and/or the extrusion width in your slicer. ADJUST THIN WALL BEHAVIOURGaps can occur in the slicing process if the diameter of the wall cannot be divided precisely trough the diameter of the nozzle. The place between, would be free. To avoid gaps in thin walls, choose the thin wall settings. If your slicer does not have this option, vary the extrusion width, and the diameter of internal and external perimeters. CHANGE EXTRUSION WIDTHGaps can occur in the slicing process if the diameter of the wall cannot be divided trough the diameter of the nozzle. The one line, which does not fit anymore will be missed. Set the extrusion width so it can be divided precisely. |
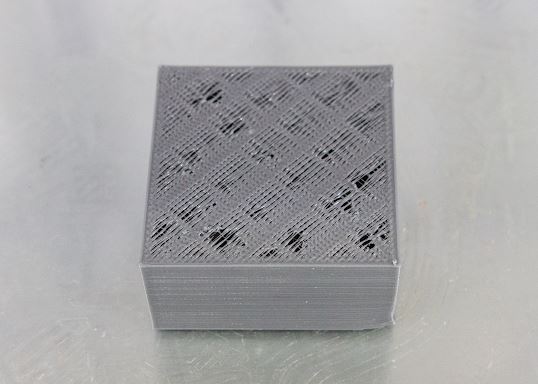
12. GHOSTINGYou can see the infill of your print at the outside on the perimeters? In this case the infill and the perimeters overlap, and you see it on the outside of the shell. Your wall thickness might be too low in relation to the size of your nozzle. INCREASE THE PERIMETERThe effect of ghosting occurs when the shell of our print, the perimeters, are too thin and the infill, which has a too big overlap with the perimeters, comes visible. For avoiding this issue, allow the slicer to make some more perimeters. How to do that – look at the screenshots below. DECREASE OUTLINE OVERLAPSYou want a good bond from infill and the perimeters, but you exaggerated it and the infill comes visible on the outside? Just decrease the outline overlap to 15-25% and control if you can “keep the ghost inside”. |
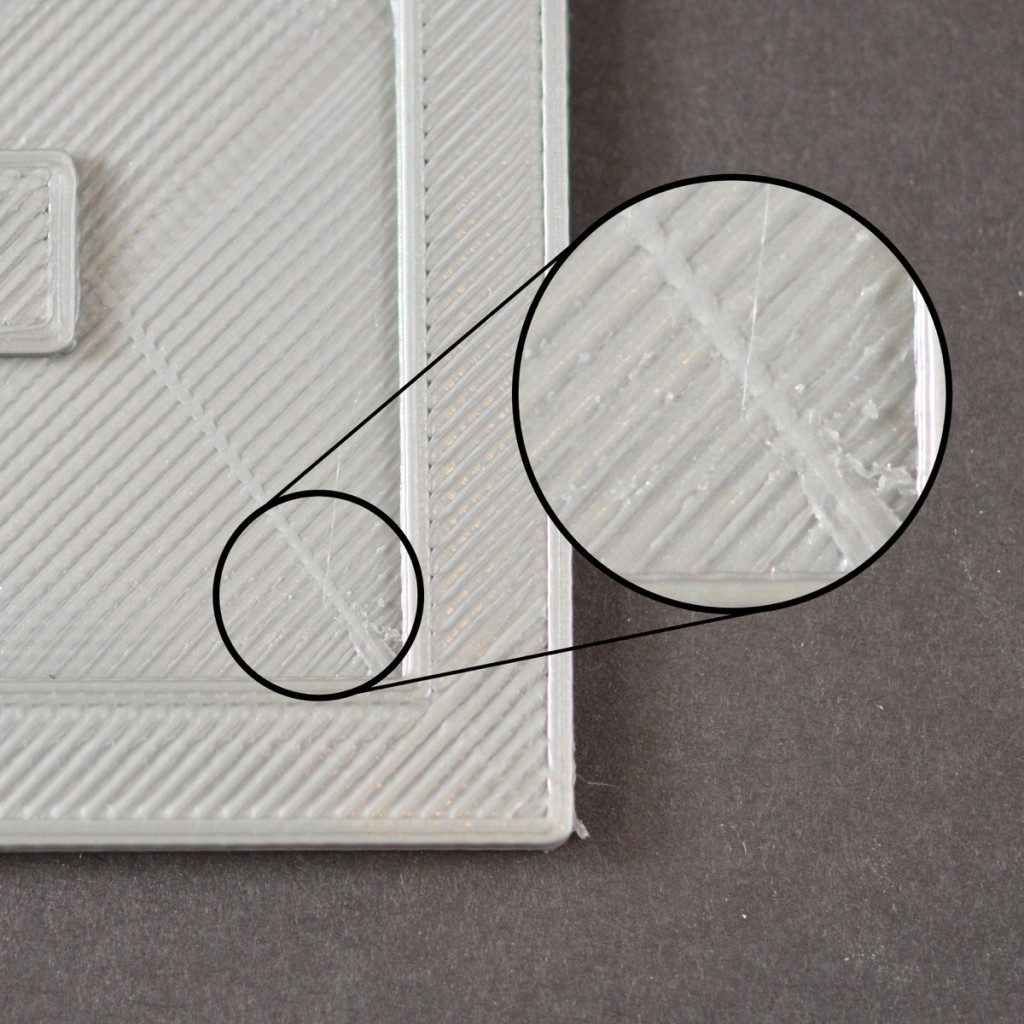
13. INCONSISTENT EXTRUSIONGood results in 3D printing are coupled with a very consistent amount of extruded plastic. This issue is visible especially at fine lines on your print and will affect the final print quality. Watching your printer closely as it prints is the best way to detect bumpy extrusion, which varies in size. Inconsistent extrusion can be affected by many causes, including a clogged nozzle, very low layer height, incorrect extrusion width, poor filament quality, filament is getting stuck or tangled and mechanical extruder issues. ADJUST THE LAYER HEIGHTIf your printer is not able to perform a very low layer height this might be a source of error. In that case set your layer height higher and check if the problem is fixed now. As a rule of thumb, take 75% of the diameter of your nozzle as maximum layer height. CHANGE EXTRUSION WIDTHOne possibility for inconsistent extrusion is the wrong extrusion width. Try to fix the problem by changing the extrusion width. As a rule of thumb, the extrusion width should be between 100 and 150% of the nozzle diameter. If the extrusion width is under the nozzle diameter, no consistent flow of filament would be able. COLD PULL METHODA cold pull works best with slippery, soft materials – like Nylon filament. What we recommend is to set the hotend to 110, 120°C and just keep on pulling on the filament while the hotend is heating until the filament plops out in one piece. Then cut off the impure end of the filament, fully heat the hotend again and repeat the process until the pulled end of your filament comes out clean and you’ve restored good flow through the nozzle. Usually, two or three passes should be enough. NEEDLE OR WIRE METHODFor this method, you need an acupuncture or hypodermic needle, so that you can try to remove the blockage. Obviously, you’ll need a needle or wire that is small enough to fit into your nozzle bore, typically 0.4 mm. SLIPPING EXTRUDER GEARAll FDM 3D printers use a small drive gear which grabs the filament and presses it against a bearing or another drive gear. This drive gear has sharp teeth, that allow it to grip the filament. If the filament is unable to move, the drive gear keeps spinning and it can grind away enough plastic from the filament so that there is nothing left for the gear teeth to grab on to. If this happens on your printer, you will usually see lots of small plastic chippings from the filament that have been shredded away. You may also notice that the extruder motor is spinning, but the filament is not being pushed in the hot end. To solve this problem, you can try:
If the extruder slipped, make sure that the drive gear of the extruder is clean, because the plastic shreds can fill in the teeth of the drive gear. If this happens it is more likely that the drive gear slips again. |
14. LAYER SEPERATIONIf the layers do not bond / melt together and individual layers warp within your part, this is called layer separation. ADJUST THE NOZZLE TEMPERATUREThe adhesion between layers can be increased with higher printing temperature. Although if you recognize that the extruder sometimes has a hard time to push the Filament trough the hotend, it´s maybe because your nozzle is too cold. Try to rise the temperature by 5-10 degrees so that the plastic flows easier. ADJUST LAYER HEIGHTIf you have problems with layer separation, one of the first settings you must check is the layer height.The layer height depends on the nozzle size you are using. Most printers have a nozzle diameter of 0,3 to 0,5 millimetre. As general formula for the maximum layer height, you can take 75% of the diameter of your nozzle – e.g.: for a 0,4mm nozzle, set the layer height to 0,3mm. PART COOLING FANSometimes disabling or slow down the part cooling fan could be a solution for separated layers. But it depends on the material you are using. For PC, SEMIFLEX and ABS we recommend disabling the part cooling fan, for PLA, PET-G and other materials please try out other solutions. DRY THE FILAMENT (PA12)PA12 / Nylon is a hydrophile material, that is why you must dry it before printing. ABS is not as hydrophile as PA12, so it should be enough to store it in an airtight container or bag after printing. As a rule of thumb, 100g of PA12 should be dried in an air circulated oved at 70-90°C for about 3-4hours. |
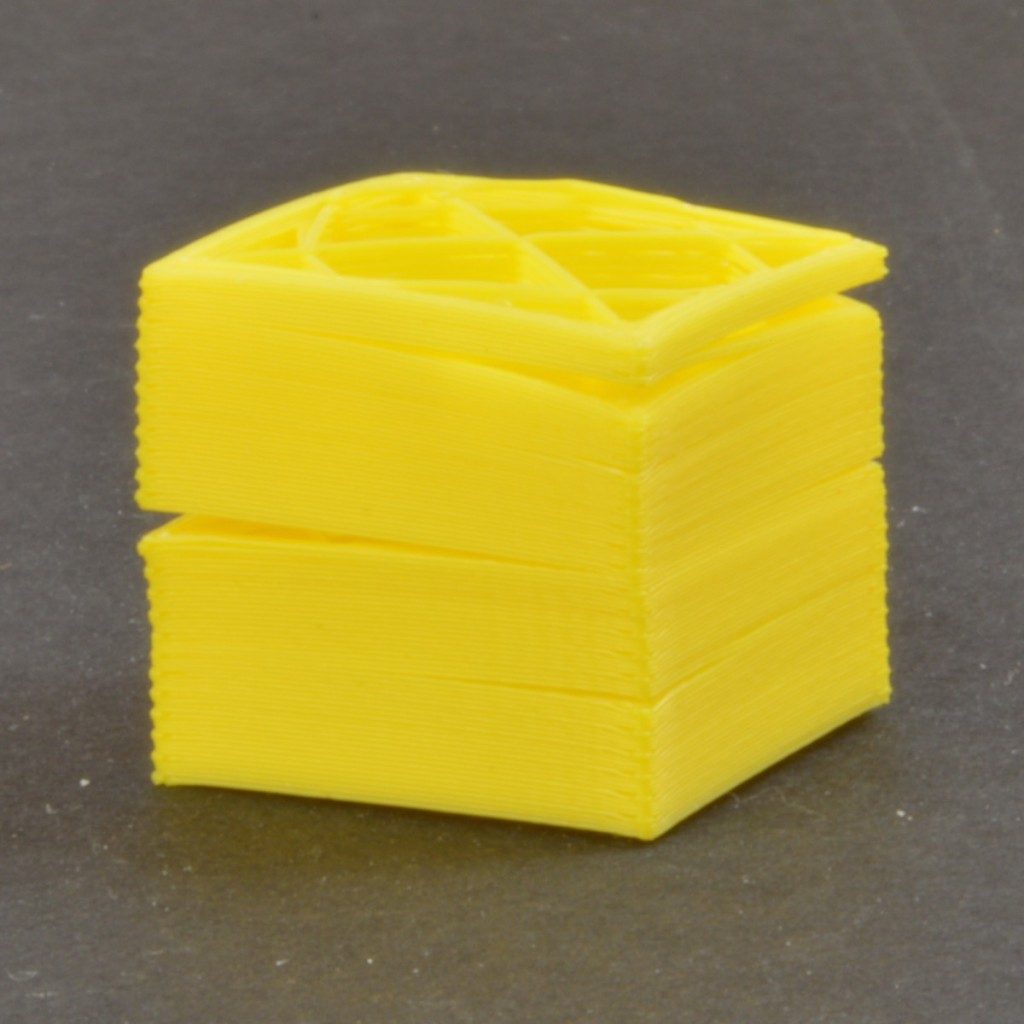
15. LAYER SHIFT OR LAYER MISALIGNMENTIf you identify a “stepping” effect in your print, this is called layer shift or layer misalignment. Most common 3D printer don´t have a feedback system, about the actual position of their toolhead/hotend. If there is an impact during the print or a motor loses steps, the printer cannot detect this and will continue the print with a wrong position.The following solutions are a good way to solve this problem, but it can also be caused by warping upper layers. ADJUST THE PRINTSPEEDIf you are printing too fast, it can cause layer shifting or a poor print quality. With high printing speed, it could happen that your belts slips over the cogwheel/drive pulleys and your tool head/hotend will lose the right position. ADJUST THE BELT TENSIONMany printers use belts for transmitting motors force. These rubber belts loose strength over time. CHECK THE RODSTurn off your printer and try to move your printer´s tool head over the whole length of your X and Y axis. If you feel a higher resistant at some points, clean the rods and lubricate them as described in your printer´s manual. If lubricating the rods doesn´t help and you still feel a resistant at some points, the rods could be bent. Check if your rods are aligned. If they are in position and you still feel the resistance, you may remove the rods and roll them on a flat ground. If they are wobbling, your rods are bent and it would be the best to replace them. CHECK YOUR BUILDPLATEThere are many different printbeds with different mounting systems on the market. We are not able to cover all the different systems, just make sure that your printbed doesn´t move during printing. Perhaps clips or even screws got loose over time and you have to fix or replace them. STABILIZE THE 3D PRINTERMake sure that your printer has stable and flat surface to stand on and check if there are any impact sources around. Even small outside influences like pokes can have an effect on your print. If you have more printers, put them on different tables, sometimes they may influence each other. |
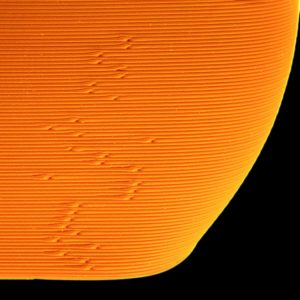
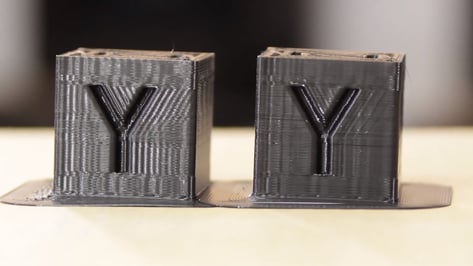
16. LINES ON SIDE OF THE PRINTThe aim of every print is that the surface comes smooth layer by layer. If one of the layers goes wrong, it is clearly visible at the outside of the object. For example: one layer of ten is wider than the others. ADJUST THE BELT TENSIONMany printers use belts for transmitting motors force. These rubber belts lose strength over time. If the tense is too low, the belts slips over the cogwheel/drive pulleys and your toolhead will lose the right position.
CHECK THE RODSTurn off your printer and try to move your printer´s tool head over the whole length of your X and Y axis. If you feel a higher resistant at some points, clean the rods and lubricate them as described in your printer´s manual. If lubricating the rods doesn´t help and you still feel a resistant at some points, the rods could be bent. Check if your rods are aligned. If they are in position and you still feel the resistance, you may remove the rods and roll them on a flat ground. If they are wobbling, your rods are bent, and it would be the best to replace them. CHECK THE Z-AXISCheck if the rods and spindle are aligned and in right position. Are the bearings and couplings ok? do they have a lash? If yes, try to fix them or replace them. We recommend you do a visual inspection first, then lubricate the rods and spindle as described in your printer´s manual. TUNE PID CONTROLLERAs often it is a combination between printing speed and nozzle temperature settings to get the best results for overhangs. We cannot give you a general solution, because different materials, printers and part cooling fans influences the outcome of the overhang very much. |
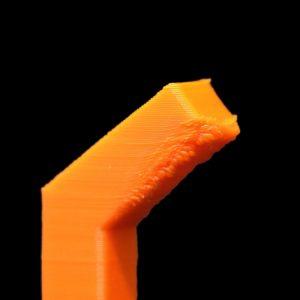
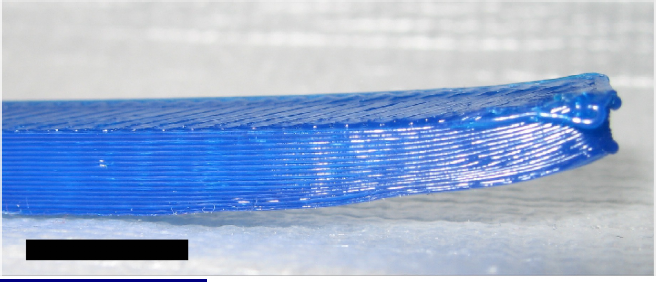
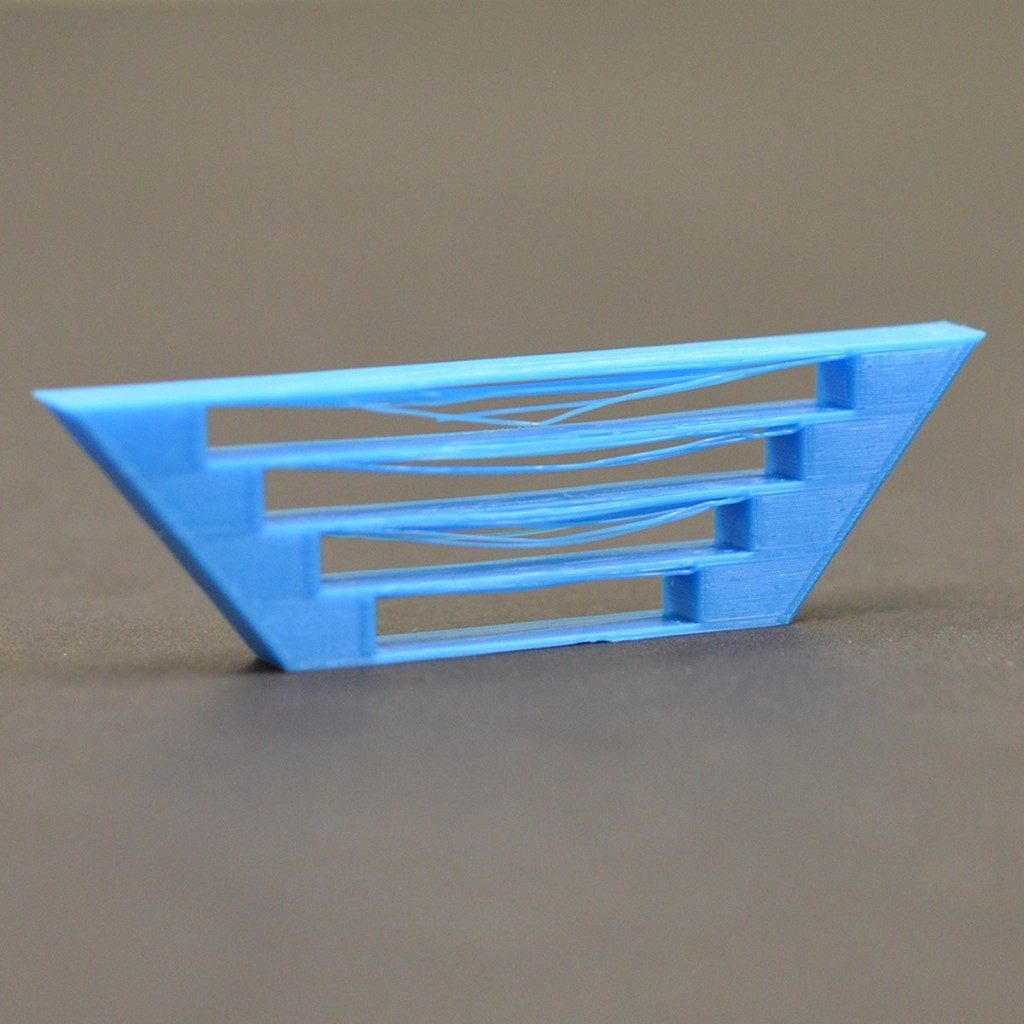
17. MESSY BRIDGESPlastic gets extruded over a gap from one point to another. When bridges are messy, the plastic strings sag. The plastic should be cooled very quick over a gap for a solid connection in-between. For an optimal performance, good calibration in bridging settings and cooling is needed. If the way is too far for bridges, use supports. ADJUST BRIDGE SETTINGBridges are difficult to make for the 3D printer. In most slicing programs there are settings for bridging. Plastic shrinks when it cools down. This is an advantage at the bridging, because the strings go up and make flat surface. Try a lower extrusion multiplier and a lower speed multiplier for better bridging behaviour. More plastic would induce a drooped string. The next layer would hang down to a bad bridging. ADD SUPPORT STRUCTUREAn easy way to get better results are support structures. We can´t recommend which settings are the best, because they change when you change layer height or material. We recommend starting with the standard settings in your slicer program, if you must change them, try the try and error method. Keep in mind, that support material takes additional printing time and sometimes optimization of your models’ placement is another solution. PART COOLING FANFor a fast cooling set the fan to a high percentage, that the plastic becomes hardened before getting sagged. There are special overdrive settings for bridging, where the fan can be risen. |
18. MISSING LAYERSA typical indication for this problem is gaps between the layers. This can be caused by partial under extrusion or by partial or completely skipped layers. ADJUST THE NOZZLE TEMPERATUREIf you recognize that the extruder sometimes has a hard time to push the Filament trough the hotend, it´s maybe because your nozzle is to cold, try to rise the temperature by 5-10 degrees so that the plastic flows easier. SLIPPING EXTURDER GEARAll FDM 3D printers use a small drive gear which grabs the filament and presses it against a bearing or another drive gear. This drive gear has sharp teeth that allow it to grip the filament. If the filament is unable to move, the drive gear keeps spinning and it can grind away enough plastic from the filament so that there is nothing left for the gear teeth to grab on to. To solve this problem, you can try:
If the extruder slipped, make sure that the drive gear of the extruder is clean, because the plastic shreds can fill in the teeth of the drive gear. If this happens it is more likely that the drive gear slips again. FILAMENT DIAMETER SETTINGSThe most common filament diameters are 1.75 mm and 2.85 mm but there exist many more. But these measurements have different tolerances which can vary from 0.01 mm to 0.1 mm. So, make sure you measure your Filament with a calliper on 4 to 5 points on the first meters and calculate the average diameter, before you use it.(Sum of measurements divided my number of measurements) Use the calculated result, to set either the filament diameter or the extrusion multiplier to the correct value. The most common method is to set the filament diameter to the standard measurement (1.75 mm, 2.85 mm etc.) and change the amount of extruded material over the extrusion multiplier. (Attention: The extrusion multiplier is the percentage of extrusion for the specific diameter.) Below you will find screenshots showing where to change the settings on Simplify3D, Cura and Slic3r. REPAIR PRINTING FILETo repair the print file might be necessary, if the you detect missing layers in the object. They can be caused by a damaged or incomplete file. There are a few options in your slicer program you can choose to repair these problems. |
19. NOT EXTRUDING AT START OF PRINTThis problem is probably the most common for every 3D printing newbie but is also very easy to solve! If your nozzle is not extruding plastic at the first layer, this can have some possible causes. ADJUST THE NOZZLE TEMPERATUREAs often it is a combination between printing speed and nozzle temperature settings to get the best results for overhangs. We cannot give you a general solution, because different materials, printers and part cooling fans influences the outcome of the overhang very much. COLD PULLcold pull works best with slippery, soft materials – like Nylon filament. Again, heat up your hotend to the working temperature of your Nylon or Polyamide filament, push it through the hotend as far as possible, ideally, until your previous material is cleaned out, which obviously is going to be somewhat hard if your nozzle is completely clogged. Then have the hotend cool down. PRIME EXTRUDERMany hotends have the problem of oozing plastic when they are sitting idle at a high temperature, which creates an empty space inside the nozzle where the plastic has leaked out. This oozing occurs most of the time at the beginning of a print when you are preheating your hotend. If your hotend has lost some plastic due to oozing, the next time you try to extrude, it is likely that it will take a few seconds before plastic starts to come out of the nozzle again. If you are starting a print after your nozzle has been oozing, you may notice the same delayed extrusion. To solve this issue, make sure that you prime your hotend right before the beginning a print so that the nozzle is full of plastic and ready to extrude. The most common way to solve this issue is to use a skirt, which are two or more lines of filament which are usually some millimetres away from the print to guarantee a constant material flow. NEEDLE METHODFor this method, you need an acupuncture or hypodermic needle, so that you can try to remove the blockage. Obviously, you’ll need a needle or wire that is small enough to fit into your nozzle bore, typically 0.4 mm. LEVEL BUILDPLATETo level your printbed and to set the height of your nozzle properly, please follow the instruction of your 3D printer. To set up the proper nozzle height or more accurately, set the correct zero position for the Z-axis helps reduce warping, getting rid of an elephant foot, but also helps to extrude the right amount at the first layer. Most 3D printers do not have a way of sensing when the nozzle touches your print surface, they just rely on an endstop or a separate sensor to probe the bed. For both cases, you usually need to manually set the zero position. The exact procedure differs from printer to printer, but the general idea is usually the same: Use a thin piece of paper for stiffer beds (about 90g per m2 or 0.1mm thickness) and a thicker paper for springy beds (about 300g per m2 or 0.25mm thickness, e.g. a business card). Adjust the endstop or sensor offset until you can feel a slight resistance from sliding the card around when the printer is at the zero position for the Z-axis. Most printers have a semi-automatic mode, by which the print head travels to several defined spots on the print surface and you must set up the nozzle height manually. If not, start in the centre of the bed for a first rough adjustment, make your way around the bed and repeat for each adjustment point. Move the print head as close as possible to the adjusters and tweak them until you get an even resistance with the calibration cards at each of them. |
20. OVEREXTRUSIONYour 3D printer extrudes more filament than necessary? You detect out leaning layers on the surface of your print? That is called over extrusion. It happens when your software and printer are not configured – the software doesn´t give the right input for the right amount of extrusion of your FDM printer. FILAMENT DIAMETER / EXTRUSION MULTIPLIERIf you detect over extrusion at your print you can manage this issue by decreasing the extrusion multiplier (sometimes it is also called “flow rate”). Every printer and every extruder have its own specific and perfect settings. Try to decrease the extrusion multiplier in your software in 5% steps. If the multiplier is set to 1, try 0,95 then 0,9, … |
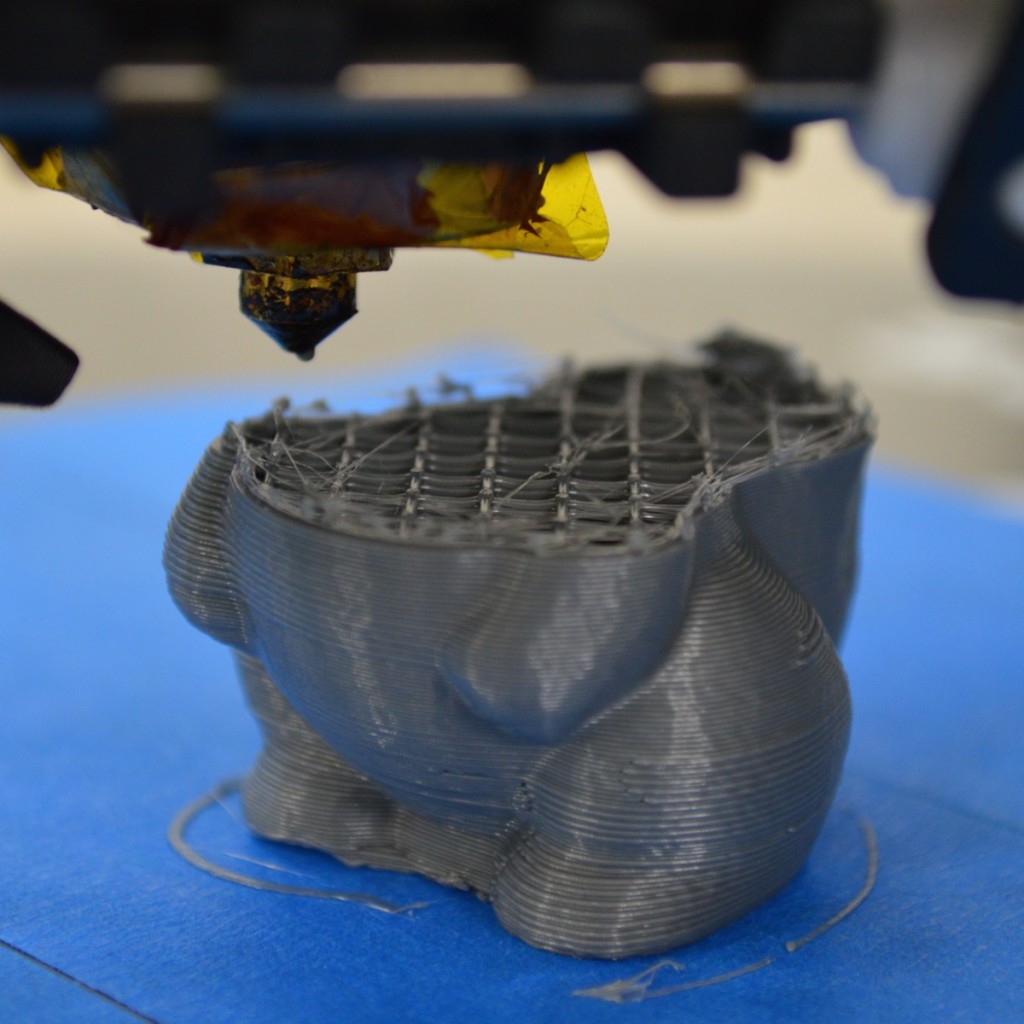
21. PILLOWING / INCOMPLETE TOP LAYERIf you spot a bad top layer with bucklings or holes and gaps, this is called pillowing. The main Problem is, that the top layer doesn´t overlap with the outline or the infill. In most cases it is caused by less infill, high printing speed or improper cooling. INFILL/OUTLINE OVERLAPMost Slicer programs allows to adjust the overlap between the perimeter (outlines) and the infill. The overlap is usually measured in the percentage of how much the infill overlaps with the outline perimeters. One of the most common overlaps percentages is 15%. If this is to low, try to increase it up to 20% or 30%. PART COOLING FANIf you are printing low viscosity materials or printing with high temperatures, the overhangs between the infill could cause also a problem. To minimize this problem your material has to cool down quite fast after printing it. If your printer has a part cooling fan you should activate it or increase the fan speed. Also check if the fan and ventilation slot are in right position (control, that the air cools your part and doesn´t go anywhere). Some materials have an extreme low viscosity at printing temperatures and that’s why you must print them with high printing speeds and part cooling fan. INCREASE INFILL DENSITYIn most cases of pillowing or incomplete top layer, the infill density is too low. 10-25% are typical infill density values. As always, it depends on your material and printing settings, therefore try out with test cube, to get the best results. INCREASE NUMBER OF TOP LAYERSTypically, you set 3-6 top layers, depending on infill density and printing settings. If you have pillowing problems, try out to increase the number of top layers. |
22. SCARS ON TOP OF SURFACEAn object is printed layer by layer. To start a new layer or move to a new location the nozzle must travel on the top of a previous printed layer. This leaves visible marks on the top solid layers of your print. To solve this problem, check the following steps EXTRUSION MULTIPLIERIf too much plastic is extruded, every layer gets thicker than it should be. By changing the location of the nozzle, scars will occur on the last printed layer. To avoid scars on the top layer of your print, set down the extrusion multiplier. VERTICAL LIFT (Z-HOP)One possibility to avoid scars on the top layers of your print is to lift the nozzle when changing location. This option allows a travel with your nozzle in an elevated state from one point of your object to another without scratching the previous printed layer. For choosing this option look at the screenshots below. |
23. SMALL FEATURES ARE NOT PRINTEDWhen printing small features, it helps to print with a small nozzle for accuracy of details. A wall which is minor than the nozzle diameter may not be shown up in the slicing program and hence not printed. To print very detailed, adjust the hardware and the software. ALLOW SINGLE EXTRUSION WALLThis option is for very thin parts which are lower in diameter than the nozzle. By avoiding this option small parts cannot be printed cause the nozzle has a wider extrusion width. This feature is only available in Simlify3D and can be found under “Edit Process Settings” by changing the “External Thin Wall Type”. The print will not get more detailed but assures that every small piece of an object will be detected by the slicer and printed. INSTALL A THINNER NOZZLEIf parts of the print are thinner than the nozzle they cannot be printed in the right dimension or not very precisely. Installing a thinner nozzle can fix this problem. |
24. STOPS EXTRUDING IN MIDDLE OF A PRINTYour printer is not extruding anymore in the middle of a print? You must abort the print? This problem can be caused by several separate causes. CHECK IF THE NOZZLE IS CLOGGEDThere are two common methods to fix this problem: COLD PULLA cold pull works best with slippery, soft materials – like Nylon filament. Again, heat up your hotend to the working temperature of your Nylon or Polyamide filament, push it through the hotend as far as possible, ideally, until your previous material is cleaned out, which obviously is going to be somewhat hard if your nozzle is completely clogged. Then have the hotend cool down. NEEDLE OR WIRE METHODFor this method, you need an acupuncture or hypodermic needle, so that you can try to remove the blockage. Obviously, you’ll need a needle or wire that is small enough to fit into your nozzle bore, typically 0.4 mm. OUT OF FILAMENTBefore you start printing, you always have to check if you have still enough filament on your reel. SLIPPED EXTRUDER GEARAll FDM 3D printers use a small drive gear which grabs the filament and presses it against a bearing or another drive gear. This drive gear has sharp teeth, that allow it to grip the filament. If the filament is unable to move, the drive gear keeps spinning and it can grind away enough plastic from the filament so that there is nothing left for the gear teeth to grab on to. If this happens on your printer, you will usually see lots of small plastic chippings from the filament that have been shredded away. You may also notice that the extruder motor is spinning, but the filament is not being pushed in the hot end. To solve this problem, you can try:
If the extruder slipped, make sure that the drive gear of the extruder is clean, because the plastic shreds can fill in the teeth of the drive gear. If this happens it is more likely that the drive gear slips again. |
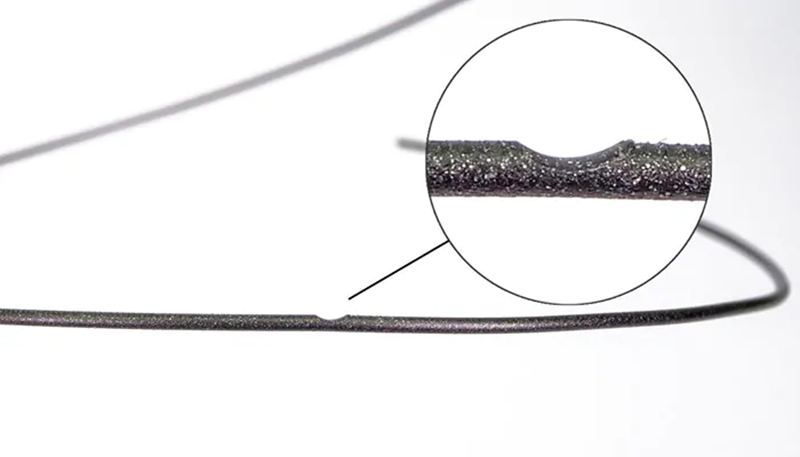
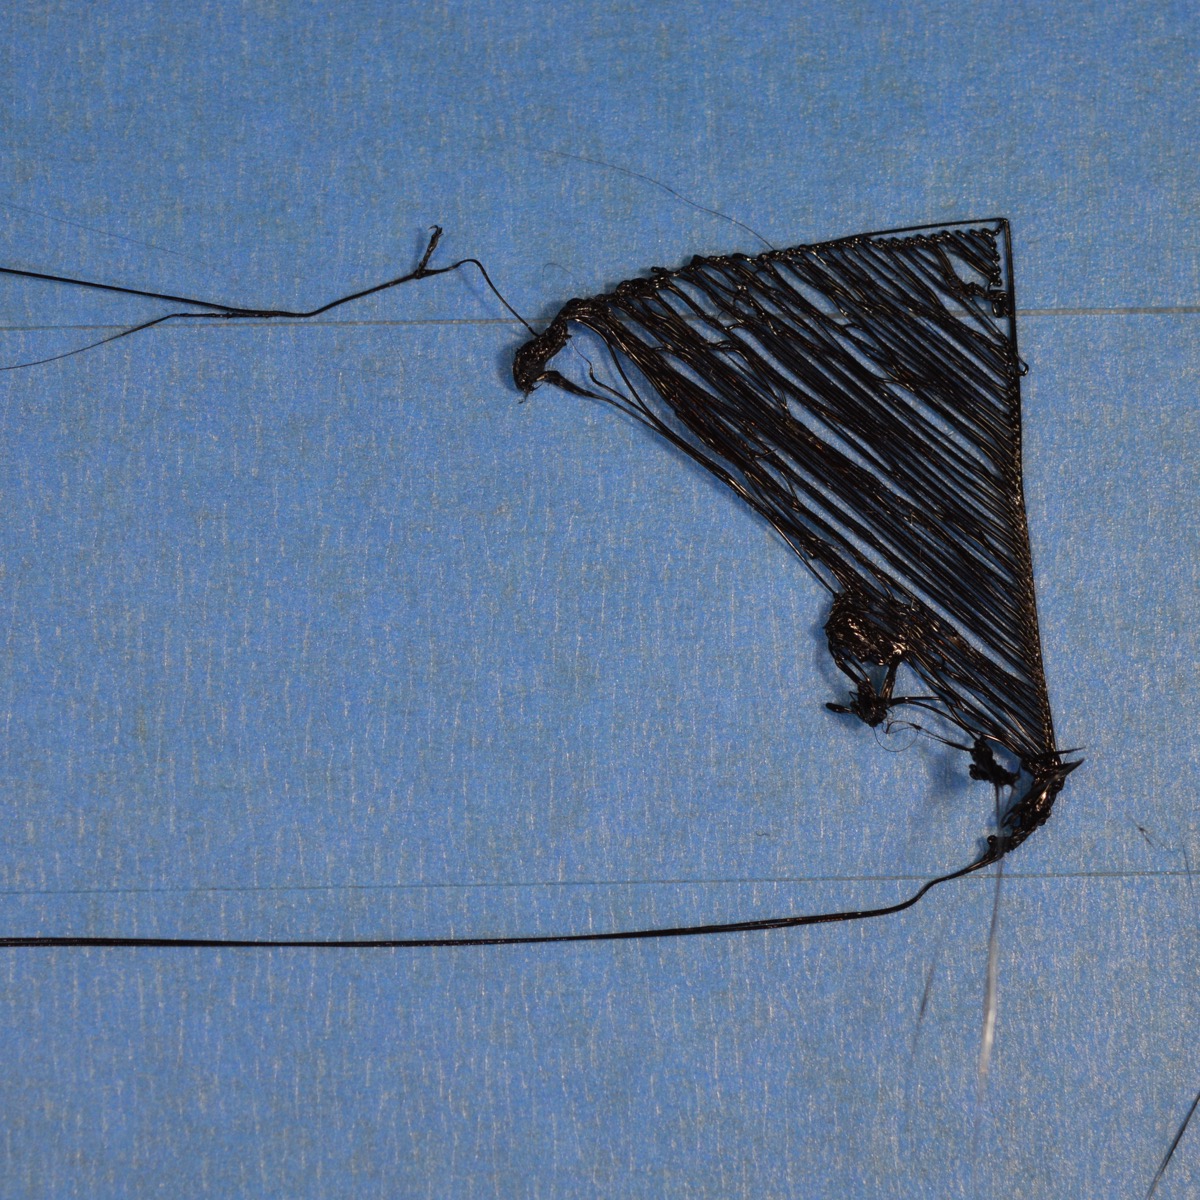
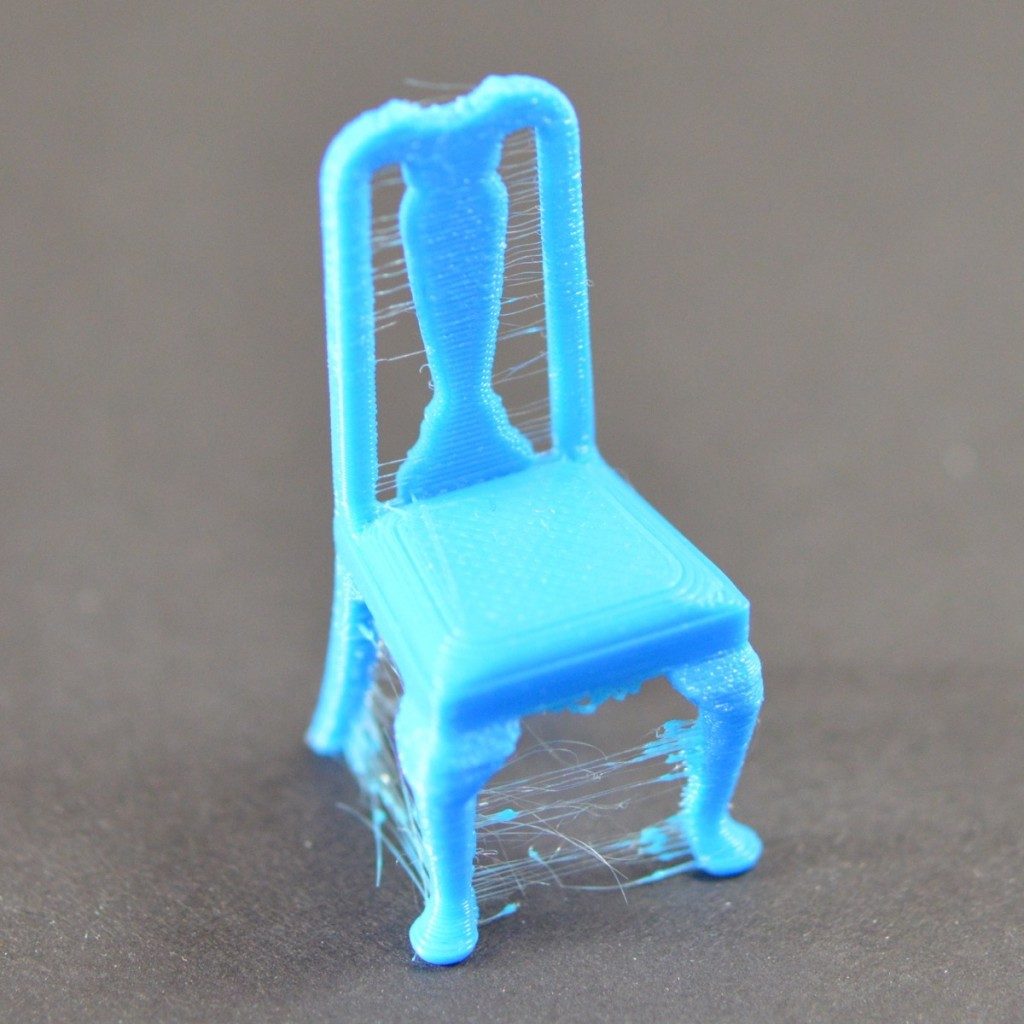
25. STRINGING AND OOZINGHairy print? If there are hairy strings of plastic on your print, which typically occur between two parts, this is called stringing. Other terms for this problem are oozing, hairy prints or whiskers. When the nozzle is moving to another location, it could happen that the fluent filament oozes/leaks out of the nozzle and produces the strings. In this case, check if the retraction is enabled, because in many cases you can solve this problem by optimizing the retraction settings. You may use a fine positive Features performance model, like the one from the make magazine. Downloadlink: http://www.thingiverse.com/thing:533472/#files ADJUST THE NOZZLE TEMPERATUREAs often it is a combination between retraction and nozzle temperature settings to get the best results to reduce stringing. If the nozzle temperature is too high, the molten filament is so liquid (has a low viscosity) that the nozzle will leak during moving to the next location. If the nozzle temperature is too low, you may have problems with extruding your filament. For the best results, try to minimize the temperature by 5-10 degrees so that the plastic doesn´t ooze anymore. ADJUST THE RETRACTIONRetraction is the pulling backwards of your filament during the printing process. When the hotend of your 3D printer is moving to a new location (extruder moves without extruding) strings may occur, because the melted filament is oozing out of the nozzle. This can be improved by pulling back the filament in the moment your hotend stops extruding. RETRACTION DISTANCEThe distance defines how much the filament is pulled back of the nozzle. It depends on your printer what the best distance will be. Try it out by printing two cubes which are 40mm away from each other and increase retraction distance by 0,5mm and monitor the best performance. For most printers, the retraction distance should be between 1 and 5mm. RETRACTION SPEEDThe retraction speed is also an important setting that influences your print. If you retract the filament too fast, the filament may separate from the melted part. Otherwise, if you retract too slow, the nozzle may leak before starts printing at the new position. For most printers, the retraction speed should be between 20-100 mm/s or 1200-6000 mm/min. AVOID CROSSING PARAMETERSThere are some slicers on the market, which have special to avoid that your hotend crosses gaps when moving from one place to another. Back to top |
26. UNDER EXTRUSIONUnder extrusion can have some different causes. A clogged nozzle, slipping extruder gear, the wrong filament diameter / extrusion multiplier settings in your slicer program. COLD PULLA cold pull works best with slippery, soft materials – like Nylon filament. Again, heat up your hotend to the working temperature of your Nylon or Polyamide filament, push it through the hotend as far as possible, ideally, until your previous material is cleaned out, which obviously is going to be somewhat hard if your nozzle is completely clogged. Then have the hotend cool down. FILAMENT DIAMETERThe most common filament diameters are 1.75 mm and 2.85 mm but there exist many more. But these measurements have different tolerances which can vary from 0.01 mm to 0.1 mm. So, make sure you measure your Filament with a calliper on 4 to 5 points on the first meters and calculate the average diameter, before you use it. (Sum of measurements divided my number of measurements) Use the calculated result, to set either the filament diameter or the extrusion multiplier to the correct value. The most common method is to set the filament diameter to the standard measurement (1.75 mm, 2.85 mm etc.) and change the amount of extruded material over the extrusion multiplier. (Attention: The extrusion multiplier is the percentage of extrusion for the specific diameter.) NEEDLE METHODFor this method, you need an acupuncture or hypodermic needle, so that you can try to remove the blockage. Obviously, you’ll need a needle or wire that is small enough to fit into your nozzle bore, typically 0.4 mm. SLIPPING EXTRUDER GEARAll FDM 3D printers use a small drive gear which grabs the filament and presses it against a bearing or another drive gear. This drive gear has sharp teeth that allow it to grip the filament. If the filament is unable to move, the drive gear keeps spinning and it can grind away enough plastic from the filament so that there is nothing left for the gear teeth to grab on to. If this happens on your printer, you will usually see lots of small plastic chippings from the filament that have been shredded away. You may also notice that the extruder motor is spinning, but the filament is not being pushed in the hot end. To solve this problem, you can try:
If the extruder slipped, make sure that the drive gear of the extruder is clean, because the plastic shreds can fill in the teeth of the drive gear. If this happens it is more likely that the drive gear slips again. |
|
27. WARPING3D prints shrink due to the its thermal properties while cooling. This puts a lot of stress on the print and with improper adhesion to the printbed it can detach partially or completely from it. There are many things you can do against warping. USE AN ADHESIVE AND OR HEADET BUILDPLATEThere are many types on the market like PrimaFix, glue stick, other wipe-on or spray-on adhesives or print surfaces like PEI, Buildtak or even unheated Bluetape. For PrimaFix we recommend the following settings:
ADJUST THE FIRST LAYERYou can also use your slicer’s settings to increase the extrusion width and height for the first layer only – this results in pumping out proportionally more material, which not only smooshes the plastic against the bed more extensively, but also makes the first layer more resistant to little adjustment errors – therefore, there is really no need to get the bed perfectly flat and bump-free down to the last 10µm. Usually you take 120-140% of the layer height for the first layer. USE A BRIMA brim is a printed structure which is attached to your print and increases the surface area of the part to stabilize it or to increase the adhesion. Brims usually have 10-15 outlines and may be 1-2 layers tall. LEVEL THE PRINTBEDTo level your printbed and to set the height of your nozzle properly, please follow the instruction of your 3D printer. To set up the proper nozzle height or more accurately, set the correct zero position for the Z-axis helps reduce warping, getting rid of an elephant foot, but also helps to extrude the right amount at the first layer. Most 3D printers do not have a way of sensing when the nozzle touches your print surface, they just rely on an endstop or a separate sensor to probe the bed. For both cases, you usually need to manually set the zero position. The exact procedure differs from printer to printer, but the general idea is usually the same: Use a thin piece of paper for stiffer beds (about 90g per m2 or 0.1mm thickness) and a thicker paper for springy beds (about 300g per m2 or 0.25mm thickness, e.g. a business card). Adjust the endstop or sensor offset until you can feel a slight resistance from sliding the card around when the printer is at the zero position for the Z-axis. Most printers have a semi-automatic mode, by which the print head travels to several defined spots on the print surface and you must set up the nozzle height manually. If not, start in the centre of the bed for a first rough adjustment, make your way around the bed and repeat for each adjustment point. Move the print head as close as possible to the adjusters and tweak them until you get an even resistance with the calibration cards at each of them. USE AN ENCLOSUREWhile the heated bed keeps the bottom layers of your part on temperature, it may struggle to keep the upper layers of the part from contracting once you start printing taller parts. In this situation, you may find it useful to place your printer inside of an enclosure that can help regulate the temperature of the entire build volume. Some machines may already include an external enclosure specifically for this reason. |
|
|